I had to buy some tools for the stained glass class, which are listed below;
all told, I spent less than $125.00 on these basic tools, the most expensive of which was the
soldering iron:
Homasote panel
Waffle panel
Glass cutters
Running pliers
Grozing pliers
Foil roller
Variable temperature soldering iron
Soldering iron stand
Wire cutters
Needlenose pliers
Hobby knife
Scissors
Eye protection
Dusting brush
First the bad news. There is no getting around this: you will need a
diamond grinder. No, it's not to grind diamonds; it uses an industiral-diamond-encrusted
wheel, called a bit, to grind the edges of glass pieces. There are two purposes for the grinder: first, to
fine-tune a cut piece of glasss to get the piece as close to the pattern as possible, and,
second, to smooth the edges of the glass to make foiling easier and, thus, joints more accurate.
As of this writing (December 12, 2024), these grinders can be had on Amazon for less than $200.00.
A work surface for your stained glass fabrication is a must to protect your
work bench, kitchen table, or whatever. The most common is a panel of
Homasote, a brand name for a product made of cellulous fiber
(recycled paper) and a wax binder. Homasote is particularly suited
for stained glass work because it is checmical- and flame-resistant.
I use a piece measuring 18" x 24" because it is large enough to
facilitate my projects yet small enough to transport easily. Homasote
panels can be obtained from almost any stained glass supply house.
Waffle boards, like
Homasote, are used to score glass on; however, waffle boards have a distinct
advantage over Homasote in that the square cores catch shards and small
pieces of glass as you score and break the pattern pieces. Waffle
boards have tabs and notches which allow sections to be joined to makes larger
work surfaces. Bear in mind,
however, that even waffle boards won't catch all the shards and small
bits; you will still have to brush your general cutting area with a:
Foxtail. Also known as
counter brushes or dusting brushes, foxtails are used to brush glass shards and small bits of glass
from your general work area. Get a foxtail with soft bristles, which will allow
you to gently brush debris into a trash can; stiff bristles will simply fling the glass
into your work room.
There are two types of specialty pliers used in stained glass crafting. The first type is the
running pliers, used to break glass along the score line created by a glass
cutter or circle cutter.
The second type of specialty pliers used
in stained glass fabrication is the grozing pliers, used
to chip and break the edges of a piece of glass that didn't break cleanly
along the score line. There are two ways to use the grozing pliers,
which we will address in our discussions of cutting glass and of cutting
deep inside curves.
Push pins are used to secure
patterns to the Homasote board. In the picture are two styles of pins;
the one on the right has a slightly longer shaft, but the head is extremely
vulnerable to melting if touched with a soldering iron; I use the style on the
left, made by JOT, because the head isn't affected by accidental run-ins with
soldering irons.
The foil roller is
used to burnish the copper foil after it has been applied to a piece of
glass. Burnishing the foil is an important step in stained glass
fabrication; it ensures smooth joints and flat outlines (more on that when
we discuss soldering).
It is important to have a good
quality, variable temperature, soldering iron.
If the iron isn't hot enough when soldering,the result will be a
"cold joint", which - aside from looking bad - is prone to breaking.
Aluminum layout blocking tools
are used to ensure square and parallel edges. They are secured to the Homasote
board with pushpins inserted though holes in the bars.
Throwaway metal-handled brushes,
sometimes called "acid brushes", are used to apply liquid flux to joints prior to
soldering.
Wire cutters are used to
cut 16-gauge pre-tinned copper wire to make hanging rings.
Pliers
are used to hold jump rings while the rings are being soldered in place.
Yes, the humble scissors
have an important place in stained glass fabrication: they are used to cut
out patterns. There are special scissors made for pattern cutting;
one type for patterns for copper foil and one type for patterns for lead
came. In my experience, however, these special scissors - which are
very expensive - are not worth the money; they get clogged with strips of
paper and require constant cleaning, making pattern cutting a laborious and
time-consuming effort, which defeats the purpose of stained glass
fabrication, which is to have fun. My advice: stick with common
scissors.
A hobby knife, along
with scissors, is used to cut patterns. One brand of hobby knife is
X-acto, available at hobby and craft stores such as Hobby Lobby.
Eye protection is an
absolute must when cutting glass or soldering. You can opt not to
wear eye protection, but to paraphrase a famous saying, a fool and his eyes
are soon parted.
A glass storage
rack is a must. You don't want your glass to be
sitting in piles where you can't see the colors.
Small plastic containers
with tight lids are perfect for storing cutting oil and flux.
These can be found at Dollar Tree and similar stores.
A great tool to have - and a necessity
if you want to cut sharp inside curves or any inside angles - is a
diamond-blade bandsaw. We will talk about the use of the
bandsaw further when we discuss cutting glass.
CONSUMABLES (supplies)
In addition to tools are what are called consumables - or, to use
the vernacular, supplies. These are things that you must replenish from
time to time, such as foil and solder.
The single most-consumed item in stained
glass fabrication, above all else - including the glass itself - is the
paper used in making patterns. This is especially true when
you're just starting out, because you will make mistakes cutting glass;
in the process you will waste pattern pieces, which you will therefore need to
recreate. This is one reason why, when we discuss patterns, I tell
you to print several copies of a pattern.
Speaking of patterns, the subject of this page is a stylized holly wreath
"suncatcher"; you can get the pattern
here.
I really don't remember where I got this pattern. A note on
patterns: I recommend printing patterns on cardstock; this makes them more
durable, and, if you use a bandsaw, it will help retain the pattern's
shape, as the bandsaw is water-cooled (which tends to make patterns printed on
regular paper mushy and come off the glass while cutting, which is really
inconvenient - not to mention annoying).
Pattern pieces are adhered to the
glass using a water-soluble craft glue stick such as that
shown in the picture. This makes cleaning the glass pieces prior to
foiling very easy.
The key to the copper foil method
of stained glass fabrication is, of course, copper foil.
Copper foil consists of a narrow ribbon of copper with an
adesive on the back to adhere to the piece of glass. The nature of
copper foil and of stained glass is such that the back of the foil is, to a
degree, visible through the glass. As partial compensation for
this, and to allow for a little artistic license, copper foil comes
with backings colored as copper, silver, or black. Note also that
foil comes in various widths, to be used on different thicknesses of
glass; the narrower the foil the less foil showing on top of the glass and
the narrower - and neater-looking - the finished solder joint.
There are several chemicals used in stained glass fabrication, ranging from
cutting oil to chemical coloring agents. The two most important, however,
are cutting oil and liquid safety flux.
Cutting oil, as its name implies, is used to lubricate the carbide
wheel on the glass cutter; the flux is used to prepare the foiled pieces
for soldering.
Pour about 1/8 of a cup of flux into a plastic storage container that has
a snap-on lid to prevent accidental spills.
There are several brands of flux available, but I prefer those
made by Studio Pro - particularly the flux; other brands I have tried
dried out in the container and became gummy.
Other chemicals used in stained glass are coloring agents, but they are beyond the
scope of this website.
Key to stained glass fabrication is
solder, which is the "glue" that holds it all together.
Solder comes in varying ratios of lead to tin; the best for stained glass
fabrication is 60/40. Also note that solder comes in at least two thicknesses;
I use what is called "thin wire" solder, which is 1/16" thick, because it gives me
greater control over the amount of solder that is applied to a joint. Again,
it's by Studio Pro.
Let the Fun Begin!
Patterns and Pattern Layout
We will begin by downloading the
pattern.
Print several copies of the pattern on cardstock; I use 110-pound (whatever that means)
cardstock with a brightness (again, ???) of 94.
Cut the pieces out of one of the pattern copies. Use either scissors or a hobby knife
to cut curves; use a hobby knife and a ruler to cut straight sections. To be honest,
I use a utility knife with a sharp blade to cut curves; I feel like I have more control
than with a hobby knife, which has a small handle.
In the illustartion for this concept I am using patterns for another project; however,
the principle is the same no matter what the project may be.
Placement of the pattern pieces on the glass is not critical, but it does require some
forethought; while logic may say to place the pieces as close together as possible to
economize, reality dictates placement of the pattern pieces in such a way that cutting
them will be practical - not forcing any hard or impossible cuts, for instance.
Take a look at the pictures below; the one on the left looks like a great, economical
layout - but how would you cut it? The picture on the right shows a practical
layout - though it does use more glass, there is plenty of room to rough-cut the
pieces without damaging any of them.
THE GLASS About glass
THIS IS BORING, but it's critical to your success in stained glass fabrication.
Cutting glass is an exercise in physics. Keeping in mind that glass is the result of a
chemical process wherein sand and several other elements, plus a chemical or two, are heated to
approximatelly 1,500°C (that's over 2,700°F) where they become a homogenous liquid. Upon
cooling the glass appears clear (unless it was treated to obtain a special finish such as
translucency); however, there are miniscule striations in the glass that cause it to fracture along
irregular lines if dropped or otherwise impacted. The neat thing about glass, however, is that if
it is scored it will break along the score line - for the most part, that is. If a
score line is straight or slightly curved, the glass will break along that score line when an
equalized pressure is applied to each side of the score line, as with a pair of running pliers.
If the score is too sharp, however - say, if you are trying to cut a circle - the glass will
act like electricty and follow the path of least resistance. In other words, it may crack
part way around the circumference of the circle, but when it finds a weak point internally it will
follow that point and crack unpredictably.
Cutting glass is a two-step process: scoring and running, or breaking.
Scoring is the practice of etching the surface of the glass using a glass cutter to create
a fissure (a line along which the glass will break when pressure is applied). The
first step in scoring a piece of glass is always to apply cutting oil to
the carbide cutting wheel at the tip of the cutter; this makes the wheel glide across
the surface of the glass as opposed to being roughly dragged across it.
To score a piece of glass, simply place the cutting wheel as close to the pattern as
possible and, using gentle but firm pressure, push the cutter along the edge of the pattern,
Try to avoid drifting into the pattern as this will cause premature dulling of the cutting
wheel.
Once you have scored the glass you need to break it. There are two methods for
breaking glass: running, which is done with running pliers, and
grozing, which is done with - you guessed it - grozing pliers.
To run a piece of glass, place the running pliers at one end of the score with
the groove on the top of the pliers aligned with the score line, then squeeze the
plier handles closed. The glass, if the score is good and there is no sharp
curve, should snap perfectly along the score line.
The operative word in that last sentence is should; there will be occasions
when the running will leave an imperfect edge, such as when, for whatever reason, the
glass decides to fracture along the edge during running. When this happens, the
grozing pliers are called into action.
To groze (is that really a verb?) a piece of glass, hold the glass firmly in one
hand and grip the errant section with the grozing pliers, then close and press down on
the plier handles at the same time, chipping the offending glass away a bit at a time.
I can't help but wonder why they aren't called chipping pliers? Well, there
is another occasion on which grozing pliers are used; that is when pieces of glass
must be broken out of small areas or areas where there isn't suffiecient room on both
sides of a score line for running pliers to work. An example of the former is shown
below under "Cutting deep inside curves", where several sections of glass must
be broken out; an example of the latter is when scoring and breaking the shallow curves
on pieces 1 and 2 of our pattern. In both cases, attempting to use running pliers
to break out these pieces would result in fractured workpieces.
I will tell you now that it is impossible, period to cut
sharp inside curves, any inside angle, or very narrow pieces of glass,
without a bandsaw.
Be that as it may, following running of, and any incidental grozing of, a piece of
glass, it's time to head to the grinder.
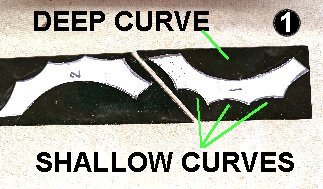
Cut the piece as close to the pattern as possible, but leaving enough glass to
get a good start with a hand-held cutter(picture 1). Note the differece
between the shallow curves and the deep curve; the shallow curves may be
removed in two steps - scoring, and breaking with grozing pliers. The deep
curve requires a bit more work:
Make the initial score along the length of the curve as shown in picture 2
Make additional score lines at shallow angles as shown in picture 3
Using grozing pliers, remove the scored sections of glass from
inside the curve, starting at A and continuing through
D. If a particular section is hard to break out,
hold the workpiece with a pair of running pliers near the score line
and, again, using grozing pliers, break the piece out. It may
take a few tries to remove the last piece (D) without
breaking the workpiece.
Referring to picture 4, cut away pieces A and B first.
Then score the outer scalloped edge, being sure to continue the
score to the edge of the glass, as indicated by the dotted green lines.
Score and break out one section at a time to avoid the glass fracturing.
If you are successfull in all your scoring and breaking you will end
up with a piece resembling that in picture 5.
Creating inside angles without a bandsaw is
simply impossible due to the nature of glass, which breaks along the path of
least resistance. In picture 1 we see a demo pattern on a piece of glass.
Picture 2 shows the score lines.
Picture 3 shows the result of trying to run one side of the angle - a clean break
to the vertex of the angle - then the break comtinues where the internal
structure of the glass took control. The point (no pun intended) is
that glass doesn't stop running inside angles at the vertex because,
frankly, glass isn't that smart - it simply does what it
does; it expects you to be smart enough to know that you need a
bandsaw.
Cutting narrow pieces
Now for a discussion of narrow areas of a piece, which cause their own set of difficulties.
Notice the very narrow area of piece number 10; this piece is very
difficult to cut by hand because of the pressure required to create the score lines and to
run it (using running pliers to apply presure along the score lines to - hopefully -
break the glass as desired). If you manage to score along side
A without breaking the piece, you will possibly break it scoring side
B - and if by some miracle you manage to score both sides and the
piece remains intact, it will most likely snap in half when you try to break out side B.
Or will it?
There's a trick to cutting narrow pieces, but it can be extremely hit-and-miss,
dependent upon how narrow the piece is, so don't be
surprised when you fail the first twenty or so times. My serious advice
-again - is to just break down and buy a glass-cutting bandsaw; it's an
investment in your new hobby and will allow you to cut narrow pieces such as this, plus tight
interior curves, compound curves, and interior angles of any magnitude.
Cut the piece as close to the pattern as possible along three sides, leaving
section A large enough to grip with running pliers (step 2);
score glass along section A (picture 1)
With running pliers, grip the piece over the pattern and, using grozing
pliers, grip section A firmly and apply enough downward pressure
to snap section A away from the piece (pictures 2 and 3)
Score section B, being careful not to exert too much pressure to avoid
snapping the piece across the "neck" (the most narrow section)
Hold the piece by the neck and as close to section B as possible
with running pliers (as in Step 2) and, using grozing pliers,
gently exert downward pressure on section B to snap section B
away from the piece (picture 4)
Use a bandsaw (picture 5)
As seen in picture 3, Section A snaps out easily. Sadly, as seen in picture 4,
the neck is simply too narrow for this piece to be cut by hand; the glass shatters
when you try to snap section B out. I can't emphasize it enough: get a bandsaw.
Cutting circles
Cutting circles requires a circle cutter. Cutting perfect
circles by hand is nearly impossible; even attempting to score a circle with a round model,
such as a coffee can, is extremely difficult because you have to eventually pass one hand
over or under the other, at which point you will need to lift the cutter to reposition it on
your opposite side.
The circle cutter has six parts, shown in the picture below. The base has a
suction cup, which is engaged by pushing down on the clamp. The circumference
of the circle is determined by setting the circle's diameter on the ruler. To
do this, move the cutting wheel assembly in or out (relative to the base); this is
accomplished by loosenig the locking wheel, moving the cutting wheel assembly to
the desired position, then re-tightening the locking wheel.
To score a circle using the circle cutter:
to minimize glass waste, cut a square of glass slightly larger than the
diameter of the circle
position the cutting wheel assembly to the diameter desired
place the base of the cutter on the glass at a point where swinging the ruler
will not cause the cutting 2wheel assembly to run off any edge of the glass
lift the clamp
while firmly pressing down on the base, push the clamp closed
apply moderate downward pressure to the rotating knob - just enough to get a good
score but not so hard that you fracture the glass (it happens, beleive me)
while applying enough pressure to the top of the clamp to keep the base from
"walking", rotate the ruler in a clockwise direction, causing the
cutting wheel to score the glass. DO NOT go over the circle twice; doing so will cause a bad
score and may cause the glass to fracture (again, it happens - believe
me!)
Breaking out a circle
Circle scored into a piece of glass
Relief cuts around perimeter of circle
Circle broken out
Note the ragged edges around the cut-out circle in the rightmost
picture, above. This is because I didn't put enough
downward pressure on the rotating knob above the cutting wheel assembly. This
requires grinding, which can result in a less-than-round "circle".
A final note about cutting circles out of glass: you cannot cut rings; the nature
of glass is such that introducing stress from multiple directions, as in concentric
circles, will cause the glass to fracture. I am speaking from experience.
To create a circle you must segment it and assemble the segments. Unfortunately,
geometry is not in my wheelhouse, so I won't even try to explain how to divide a circle
into even segments.
Grinding
Grinding serves two purposes: removing extra glass and smoothing the sides of a
piece of glass, particularly after grozing. The former is necessary because there
will be occasions where a piece isn't snapped or grozed close enough to the pattern;
the latter is necessary because smooth edges are vital to close-fitting pieces, which
are vital to good joints and good-looking projects.
The Grinder
Parts of a grinder
Grinder bits
come in different diameters for different applications
Grinding a piece of glass is a fairly simple task, but you must be careful to keep
the glass moving or, since the bit is round, you might unintentionally grind a divot
into the workpiece. This is especially important to remember when trying to grind a flat
edge - if you don't keep the glass moving on a plane you will wind up ruining it.
Also important to remember is that the bits are not pressure-sensitive - that is to say,
the bit will not give you a measured degree of resistance relative to the pressure
with which you push the glass against it. The bit, though it spins, is fixed;
it is up to you to regulate the pressure applied against it.
Finally, keep in mind that a bit's lifetime depends upon use; a frequently-used
bit will wear out more quicky than one that is used less often, and that new or
infrequently-used bits have more cutting power than older bits and therefore require
less pressure than older bits do.
Foiling
Foiling doesn't mean disrupting someone's ill-intentioned plans; it means
applying copper foil to the edges of cut pieces of glass. Foiling is
pretty straightforward: you simply run a band of adhesive-backed copper foil around
each piece of cut glass. As mentioned earlier, the copper foil is the main
building block for stained glass fabrication; it is the foil to which the solder
adheres to hold the project together. Solder does not stick to glass.
The most important aspect of foiling is getting the foil centered on the edge of the
glass so that when it is folded over it is even on both sides of the glass; the worst
thing that can happen is for the foil to be off-center on the edge of the glass, which
will cause more foil to be on one side of the glass than the other. Aside from
looking bad when foiling, this will cause more solder to stick to one side of the piece of glass
than the other, which will cause a weak joint and will look really sloppy.
Working with one piece of glass at a time, soak the workpiece in a wide,shallow storage
container in about 1/4" of water until the pattern piece is soaked through.
Remove the glass from the water and remove the pattern piece from the glass.
Dry the glass well - the foil won't stick to wet glass.
Now apply the copper foil to the edge of the glass, being sure to center the glass
in the foil. Begin about 1/4" from one end of the glass and continue around the
piece until you are back where you started. Overlap the starting point by about
1/4".
Now carefully fold the foil over both sides of the glass, being sure to press firmly
as you go.
The final step in foiling is burnishing. This is done with the
roller. Simply push the roller along the foil using
moderate pressure and a back-and-forth (sawing) motion as you go. The burnished
foil will look like the foil on the left in the picture below. Notice the
bumpy, unburnished foil on the right; this would not present a good soldering surface.
Also - and this is important - be sure to roll the edges of the glass as well
to ensure a good close fit between pieces during assembly.
IMPORTANT! Foil only one piece of glass at a time, and only
when you are ready to set the pieces for soldering; this will avoid the confusion that
can arise if multiple pieces of glass are foiled without placement on the soldering
pattern (explained below in Soldering).
Soldering
Ah, solder, the glue that holds everything together! Well, not really
glue, but it does hold all the pieces of cut and foiled glass together.
And make no mistake - even a tiny ball of hot solder will burn you, so
be careful to always solder over your Homasote panel. And always, always,
wear eye protection!
To start you will need a copy of your pattern on which to secure your cut pieces while
soldering. This is where the pushpins come in. As seen
in the picture below, pins should be placed so that each piece is secured firmly;
even 1/16 of an inch of movement of a piece of glass while soldering will ruin your
project.
And to answer the question you're probably asking - and to which I found the answer
the hard way - is no, you can't simply un-solder the mistake; the
process of removing the errant solder and trying to readjust the joint will do two things:
first, it will frustrate the daylights out of you, and, second, it will ruin the foil
on one, or both, of the pieces of glass - and refoiling is a pain because the existing
foil comes off in small bits.
If, however, you can't resist and do attempt to un-solder a joint and ruin the
foil in the process, after you have removed the existing foil from the glass, wash the
glass in warm soapy water to remove the adhesive residue left behind by the original
foil; the new foil will not adhere to the glass correctly if you don't.
The lesson I am trying to teach is simply this: use extreme care when pinning glass pieces to
the Homasote for soldering to be sure nothing moves; if you make a mistake after you've
soldered several pieces of glass together, a moving solder joint will ruin your
project. Period. And you will cry. Period.
On to the project!
There are three colors of glass in this project; I am not being paid by Spectrum, but
I recommend:
COLOR
MANUFACTURER
NAME
CODE
Green
Spectrum
Dark green Transparent
SP 125
White
Orange
Spectrum
Red / pale amber waterglass
SP 45120W
I opted for the combination red/pale amber waterglass for the orange because it looks
like flame. Expressing my artistic side, doncha know?
The first step in the project is to cut and grind all pieces to shape. Be
careful when cutting the bottom edges (shown at A in picture 4 under
""Cutting deep inside curves") of pieces 1 and 2 to be sure not
to "clip" (chip off) either corner, which will make the joint between pieces 1 or 2
and piece 3 look really bad.
Once all the pieces have been cut and finished, prepare the Homasote for assembly
of the project by laying down a copy of the pattern on top of the board.
It is now time to foil the pieces of glass. As mentioned under Soldering,
foil just one piece of glass at a time to avoid mixing up the pieces. It's hard to
mix up the three green pieces of this project, but your future projects may comprise
a dozen or more pieces, some of which may be similar in size and shape; since part of
the foiling process is removing the pattern piece from each piece of glass, foiling
more than one piece of glass at a time could well cause confusion.
Now take pieces 1, 2, and 3 and pin them to the pattern, being sure to
secure them firmly. The nature of the fit of piece 3 against pieces 1 and 2 is
such that piece 3 requires no pins along the top edge.
Continue by foiling and pinning pieces 4 and 5.
Refer to the picture below for pin placement. It may look like overkill,
but remember that glass movment during soldering can, and most likely will,
ruin your project; for that reason the idea is to basically take the glass captive.
Not sure you've used enough pins? Put two fingertips on each piece of
glass and try to wiggle it in every direction; if you can wiggle the glass in any
direction, you have't used enough pins.
Once you have secured the pieces to the pattern, it is time to apply flux to the
joints. Dip the end of an acid brush into the flux and paint it onto the
joints. Don't be stingy with the flux, but don't go crazy with it either; the
stuff dries sticky and you don't want sticky all over your work area.
Once the flux is applied it is time to solder. Set your soldering iron to
approximately 400°; this will ensure a good melt of the solder and a good, solid
joint.
Now unwrap approximately 6" of solder from the spool and straighten it out.
Hold the spool in your passive hand, with the solder extending between your
index and middle fingers; hold the soldering iron in your dominant hand. Hold
the end of the solder to the joint and touch the tip of the soldering iron to the
solder. The joint will sizzle as the molten solder hits the flux. Pull
the solder and the iron along the joint from one end of the joint to the other in
one motion at a moderately slow, steady pace to ensure a proper amount of solder is
applied.
The solder should appear shiny as it flows onto the joint; if it doesn't, your
soldering iron isn't hot enough.
Allow the solder to set for one hour, then turn the piece over and apply solder to
the joints on the back. If you turn the piece over before the solder has had
time to fully cool, the solder will be flattened and the joint will look horrible.
The next step in soldering the project is to apply solder to the front, back, and
side edges; this is done by using the soldering iron as a de facto paintbrush, as
demonstrated in the videos below:
The piece on the right looks more finished than that on the left
As with the joints, this process is begun by applying flux to the surfaces to
which solder is to be applied. To "paint" the top and bottom edges of the
workpiece, hold the solder to the tip of the solering iron and draw a bead of solder
onto the iron. Now, using a stroking motion, draw the edge of the tip of the
soldering iron along the foil; the solder should flow onto the foil easily and
should dry shiny.
Applying solder to the edges of the piece
Applying solder to the side of the piece
(yeah, I know I said edge; I meant side)
To apply solder to the sides of the workpiece, repeat the steps above;
the only difference is that you will be holding the workpiece in your passive hand
while applying the solder to the sides. Be careful to work away
from yourself so that molten solder doesn't accidentally drip on you.
The Final Step
The final step in our project is attaching the hanger loop, also called a
jump ring.
Making jump rings is really easy, and when you're done you'll have rings for several
projects.
First, you will need:
A knitting needle (I used a number 8) to use as a core
16-gauge pre-tinned copper wire
Wire cutters
pliers (needle-nose or regular, but regular are better (I'll explain why in the how-to)
Begin by cutting a 6-inch length of wire. Hold one end of the wire against the axis, then
closely and tightly (but not too tightly) wrap the wire around the knitting needle to form what is
essentially a spring.
When all the wire has been wound around the knitting needle, remove the coiled wire from the needle.
Use wire cutters to clip the coil to
create wire ringlets. Use pliers to flatten the ringlets so that the ends
meet.
16-gauge wire wrapped around #8 knitting needle to form a coiled wire "spring"
Coiled wire "spring" removed from knitting needle
Wire ringlets formed by cutting coiled wire "spring"
Soldering the jump ring to the project
Start by laying the project upside down on your work surface so that the top point is overhanging
the edge. Apply flux to the back of the piece at the point. Now grip a jump ring in
the jaws of a pair of
pliers and hold it so that the split in the ring rests on the point of the
workpiece. Get a bead of solder on the tip of your soldering iron, then apply the solder to
the ring to adhere it to the back of the workpiece. If the ring is soldered incorrectly, apply the tip
of the soldering iron to the joint to melt the solder and reposition the ring. NOTE: do
not reposition the ring too many times, as doing so will cause the foil to separate from the workpiece - and, as
I said before, you will cry!
The absolute final step in the project is to wash the finished piece in warm soapy water to remove
flux residue, which is very sticky and not very pretty to look at. Be gentle so you don't
accidentally separate the foil from the workpiece.
Well, that's the end of our lesson in copper foil stained glass. I am hopeful that you were
able to follow me without difficulty; I tried to be as thorough in my explanations as possible.
If you have any qeustions about something I've tried to explain, feel free to write to
me HERE.
This web page is humbly dedicated to the loving memory of my father, Radioman First
Class Itto Calo, United States Navy, and to the loving memory of my father-in-law,
Wilmer Lee Gardner, Staff Sergeant, United States Army Air Forces. Thank you
for your service, Dads; we love you and miss you.
Radioman First Class Itto Calo
United States Navy
Staff Sergeant Wilmer Lee Gardner
United States Army Air Forces
Distinguished Flying Cross
Air Medal w/ 3 Oak Leaf Clusters


 C-40 diamond bandsaw")